
A well-maintained heater should run quietly. If you notice banging, knocking, screeching, or buzzing noises, it may be time to call Comfort Pro’s Heat and Air.
A faulty heater can cause expensive electrical bills. A technician will start by testing your circuit breaker and inspecting the unit for signs of malfunction. As the weather across Hampton Roads shifts from mild fall to chilly winter temperatures, many homeowners are turning on their heaters. However, if you’re experiencing problems with your system, there are troubleshooting steps you can take at home before calling a professional to assess and perform repairs.
If your furnace delivers cool air instead of warm air, the problem could be caused by dirt, dust, or other debris clogging the vents or filters. Often, simply replacing or cleaning the filter will resolve this issue. It’s also good to vacuum the vents and other areas where the system circulates air to prevent clogs.
Other common issues that may cause a malfunctioning heating unit include a thermostat not sending the correct signal to the furnace, a dirty pilot light, or a broken or disconnected wire. Changing the thermostat setting from “COOL” to “HEAT” will activate your heating settings. Also, it is important to avoid locating the thermostat in direct sunlight or near a hot appliance or vent, as these factors can skew temperature readings and cause the heater to overheat.
If you have a programmable thermostat, try resetting it per the manufacturer’s instructions. If the thermostat continues to malfunction, it may need to be replaced. The average lifespan of a thermostat is about ten years. If you cannot fix the thermostat, a professional should inspect it to determine if it needs to be cleaned, recalibrated, or repositioned.
If you have an electric heat pump or furnace, this handy Fix-It Guide explains how each system works, what can go wrong, and simple troubleshooting tips. The guide provides step-by-step instructions for disassembling radiant and convective heaters, removing electrical wiring clips, and checking the ceramic heating element for damage or wear.
The thermostat is one of the most important equipment for your heating and air conditioning system. It’s the little switch that controls how much energy is used and in what direction it goes — and it can also be a source of frustration when it starts to fail. Fixing the thermostat on a heater is fairly easy, depending on what kind of thermostat you have.
Traditional thermostats have two different pieces of metal bolted together to form what is called a bimetallic strip. This strip is a bridge in an electrical circuit connected to your furnace. When the heater is switched on, the strip gets hot, and the electricity flows across it. As the strip cools, it bends slightly, and the electricity stops flowing, switching the heating off. Then, when the room temperature reaches the set point on your thermostat, the electricity re-enters the circuit and switches the heating back on.
Modern thermostats come in a variety of shapes and sizes. Some thermostats connect to a computer via a cable, and smart thermostats can be programmed and controlled from a smartphone or tablet app. If you have a smart thermostat, ensure it is correctly connected to your home’s Wi-Fi network. If the thermostat is not responding to commands from your phone, you may need to reset it to its default programming.
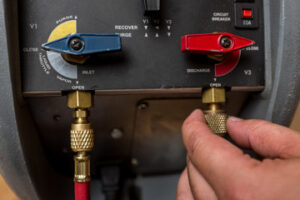
Before working on a heater, ensure the circuit breakers in your service panel haven’t been tripped. That could be a sign of an electrical short, so it’s a good idea to check the fuses and breaker box before proceeding.
Before you open your water heater to remove its upper and lower thermostats:
- Shut off the power using the service panel’s breaker.
- Remove the access panel, insulation, and plastic safety guard on each heating element, and carefully remove any wires or terminals that might be exposed.
- Be careful not to touch any of the incoming or outgoing coolant lines.
The blower is a motor that drives the fan built into your HVAC system to provide airflow for your heater, a/c, and defrosters. It’s a necessary part of any vehicle; you can’t drive if it doesn’t work.
The blowers are usually tucked in a hidden area underneath the dash or accessed through an access panel inside the passenger compartment. That means that if your blower motor is faulty, you’ll have to get the car into the shop and disassemble the dashboard to gain access to it.
Blower motors can develop problems in various ways, including overheating due to friction, dust, and dirt or improperly lubricating. The engine will shut down to protect itself from self-inflicted damage and will only start up again once it’s cooled down. A bad resistor, a defective fan switch, or other electrical components can cause overheating. Thankfully, most problems are easy for a professional technician to diagnose and repair.
Unusual sounds from the blower motor are often the first sign of a problem. Squealing and screeching noises indicate a belt or bearing issue, while rattling and banging noises often point to a motor at the end of its lifespan. These issues should be addressed immediately before damage to the engine or other surrounding components.
You may see smoke or smell burning plastic when the blower is turned on. If this is the case, shutting off your vehicle and calling for a service technician as soon as possible is important. The smell of plastic burning indicates a major electrical problem in the engine bay and should not be ignored.
Heating elements are a common component that can fail, resulting in the heater not producing hot water. The good news is that if your heating element is bad, you can replace it. The procedure is relatively simple, requiring only a few tools and some knowledge.
The first thing to do when you suspect a heating element problem is to perform a visual inspection of the unit. Look for discoloration, rust, or burns. If any of these is present, the element should be replaced immediately.
However, before you can test the element, you must shut off the power to the unit. You can do this by turning off the circuit breaker or removing the fuse that controls power to the heater’s circuit. Next, shut off the supply valve, delivering water to the unit. You can find this shut-off valve in the basement, near the water heater, or on the cold-water line supplying the team.
After you’ve shut off the power to the unit, you can safely remove the panel covering the upper and lower heating elements on the water heater. You may need to remove clips or fasteners that secure the panels to their housings. Once you can access the heating elements, disconnect their terminal leads using a multimeter set to measure resistance.
You should read the manufacturer’s instructions and consult the unit’s manual for specifics. Still, you can generally connect a red lead from your multimeter to one of the element’s screw terminals and a black leader to the other. If you get an ohm reading of 0, there is no flow of electricity through the heating element, and it is defective.
You can also test the element by connecting its terminal to a socket-type heating element that fits the unit’s heating element. Some repair kits come with the necessary socket. You can turn the feature counterclockwise with a ratchet wrench and a one-1/2-inch socket to loosen it and remove it from the water tank. It would be best if you used a gasket sealer when you installed a new heating element and a metal washer to protect the metal bracket that supports the component of the unit’s tank.